Tuesday, April 26, 2011

Royal Wedding

Once upon a time there was a ordinary, middle class little girl who grew up in England.


The girl's parents (the king and queen) sent her to the best schools so she could mix with people who were much more posh than they were, hoping it would rub off.


She met a nice college boy and, after they were friends for awhile, they fell in love. Turns out he was the future King of England! Some of their dates were a little crazy, but she did her best to be a good sport, as she had been brought up to be.


Finally, the prince asked the young woman to marry him. She was kind of happy, but it was a bit overwhelming imagining what her life would be like with all those royal what-nots and why-evers she would have to deal with.


She wasn't so sure about his family. The engraved invitations to afternoon tea were a bit much.


Meeting the prince's brother was also almost a deal breaker, but she decided he was pretty fun.


The wedding turned out to be bloody brilliant.


The band was stellar. Everyone danced into the night. The wine flowed and no one behaved themselves.

They lived happily ever after and managed a halfway normal life after all that wedding stuff died down. They were well brought up, reasonable English people, after all.

Enjoy the wedding!

All images are from vintage bookpage cards available in sets at
www.etsy.com/shop/velvetonthepage.com
(click on the link at the top of the page to make it easy!)

Tuesday, April 19, 2011

Frank Gehry for Frank and Gary, 7th grade upcyclers

I am lucky enough to be able to write curriculum for the Beaverton, Oregon Art Literacy program which teaches art history to elementary and middle school students which then leads them in a art project connected to the artist or culture they learned about. Classes are taught by parent volunteers and it is one of the only ways children are exposed to art history in public school anymore.

The lesson I just wrote is about the architect Frank Gehry.

Gehry may be the most celebrated "starchitect" alive today. He's most well known for large buildings like his "Fred and Ginger" dancing building in Prague.....

....which was modeled after the dancing forms of Fred Astaire and Ginger Rogers.


But his work I like the best are the private residences he designed which mixed modern industrial materials with natural materials. Note the contrast between the glassy tiles and the natural wooden beams in this California beach house.


This is Gehry's own private residence that he deconstructed by adding steel walls, chain link fencing, concrete slab steps and glass skylights to the original structure. You can still see the original little pink stucco house peeking out from the design.


For the art project, middle schoolers are given a choice of materials from the recycling bin and the backyard to design a small model of a deconstructed doghouse, camping hut, bike shelter, or other small structure. This solar heated camping hut model uses cardboard, aluminum foil, bubble wrap, clear plastic salad containers, staples and clear packing tape, as well as some round stones. 


The hut has working front doors modeled on a flower.


One of the best things about this project is the reuse of recyclable materials and items from nature, which costs the school and Art Literacy Program almost nothing since volunteers bring them in. The clear tape, staples and perhaps the aluminum foil are the only items that need to be purchased. Creating new, useful or beautiful things out of old items that might have been discarded is called upcycling.


Think there might be an important lesson for middle schoolers and all of us from Frank Gehry and the ways things can be upcycled? I think so.....that's one reason I continue to work with old and vintage things to remake them into new things that can continue to be treasured.
 Happy Earth Day on Friday!

For a fresh etsy shop called Gloomstopper Studios that features great earrings upcycled from of the inner tubes of bicycle tires, go here:  http://www.etsy.com/shop/Gloomstopper


Geary photos from Scholastic Art Magazine, April/May 2006, Vol. 36 No. 6
Used for educational purposes
Gloomstopper earring photo used by permission from artist


Tuesday, April 12, 2011

Bringing nature indoors- spring


It is spring in Portland, although the robins had to break through a layer of ice this morning in our birdbath. With Easter coming and spring late, we are feeling the need for a little nature fix. How about bringing nature inside since it's so cold outside, and without spending money or having to water anything?

 Starting with the front door, if you have a couple of pots to put on either side, find some interesting branches and stick them in some dirt. The branches can be numerous and stand on their own, and may even take root and sprout leaves if you water them. I splurged on some primroses and do water them when I remember. The boxwood wreath I made in an earlier blog helps things look hopeful and springy.

Bringing cut branches inside helps give a ready-to-bud feeling to your rooms. These are some birch branches I found while walking the dog. They were so long they just naturally formed a curved arch above our fireplace and I liked it so much I kept it that way. No watering necessary! Of course, if you like things a little neater, the branches could be shorter and stick straight up.

A friend made these simple candleholders out of some thick cut branches. Cut three sections with a saw in three different heights. Although these were cut out with a large drill bit, votive or tea lights in a glass jar could also just be set on top.  

River rocks also are simple and beautiful- and free. I collect rocks on walks and we have some in our landscaping we got for free years ago from someone who had an extra wheelbarrow full. Just wash them, pile them into a vase, bowl or mason jar and be reminded of beach and river walks. Agates are wonderful too.

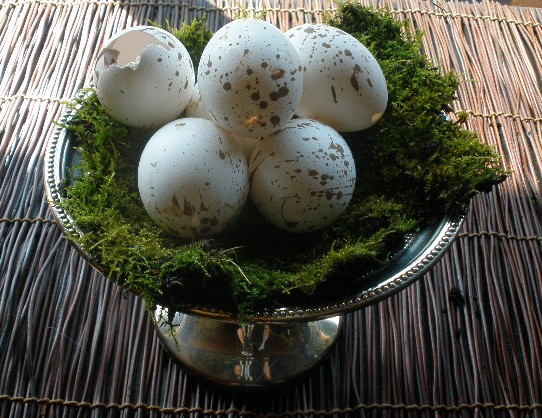
A really Eastery-springy idea is to blow some eggs. Take a raw chicken egg and poke a hole in each end with the tip of a sharp knife, making the hole as small as possible. To make the blowing easier, take a bamboo skewer or a toothpick, stick it in the egg and try to break the yoke. Then lean over a bowl and blow the raw egg out into the bowl. If you get a blow-out as seen above, it's okay- it just looks like something hatched. While letting the shells dry, make scrambled eggs or a quiche!


You can paint them as described in the wreath blog or leave them gloriously egg shell white. Grab some moss off a rock or tree trunk (or buy it if you must) and set it in a bowl or on a pretty plate. Set the eggs on top. Watch out for cats because they love to play with them and break them. Scrambled eggs AGAIN anyone?
Happy Spring!


Saturday, April 9, 2011

Make a glowing collaged lampshade

Every room needs a lamp or two. Living in the Pacific Northwest means some dark days, and lamps give a warm, inviting glow without the glare of overhead lights. However, most lamps come with a plain white shade, and here is an easy way to personalize and decorate them.

Supplies you need are a plain, flat lampshade made of fabric or heavy paper backed with plastic as most inexpensive shades are. This one was $7 at Target. You need some scissors and paper to collage with. I like to buy cheap classic paperbacks at garage sales or Goodwill (this one is Pride and Prejudice by Jane Austen), tear the pages out and cut them into leaf shapes (cut several pages at a time). Any paper item will work including color or black and white copied images or scrapbook paper. Heavy paper like old postcards will work but won't glow through the paper. Pictures that are printed on both sides (such as pictures cut out of magazines) will work but know that what's on the back may show through when the lamp is turned on.

You also need a 1" or so paintbrush and Mod Podge, a waterbase sealer, glue and finish that you can buy at any craft store (use a 40% off coupon!). You can buy either a gloss finish which I prefer or a matte finish which is less shiny.

Start by shaking the closed container of Modge Podge to mix it up. Then dip your paintbrush in it and cover a 5-6" square area heavily with the Mod Podge. Start placing your cut paper onto the lampshade on the the wet area, covering the top of each paper item with Mod Podge using your paintbrush. You can choose to overlap the cut paper, scatter it so some of the plain lampshade shows through, or make a regular pattern. For this lampshade, I chose to place some leaves so they hang down slightly over the bottom edge. If you do this, paint some Mod Podge on the other side of the tip of the paper also to strengthen it. Continue this process until the entire lamp is covered. You can use your finger to smooth wrinkles or bubbles as you go, but most of them will flatten as it dries. The Mod Podge may look milky as you are applying it but will dry clear. After it dries, you can give the whole thing one more coat with Mod Podge to make sure everything is adhered.


Here is the finished product. The paper lampshade will look opaque when the lamp is turned off, but will magically transform into a glowing art piece when it is turned on.

Here is one I made by color copying the vintage travel postcards I bought at the estate sale last week and collaging them onto a lampshade.


Here's one I did a few years ago with actual Tarot cards which I love, but since the cards are a heavier weight paper, they don't glow. Next time, I would make color copies of the cards instead.


Here are a little pair of vintage lamps I bought at Goodwill a few weeks ago for $4 each that I absolutely love. Clear glass lamps are very chic right now and you can see them in expensive catalogs for $30 each, or knock-offs at Target for around $18. If you buy old lamps, make sure the plug looks safe. These have had their original cords and plugs replaced with newer ones (not by me, but I've heard it's not too hard).

Start collecting some paper images you love and get glowing!

To see a fresh etsy shop that features amazing paper collaged cards called Local Wisdom, please go here: http://www.etsy.com/shop/localwisdomcards?ref=seller_info


Monday, April 4, 2011

Thrill of the treasure hunt

For me, a true treasure hunt means estate and moving sale hopping with a friend who knows what she is doing. On a recent Saturday, we seemed to hit the jackpot in SW Portland at several sales. Since I often use vintage items in my artwork, I am looking for specific things but one trick is to keep an open mind and eye for surprises-  like these beautiful floral hankies that will be used for something fabulous.


Costume jewelry can be quite inexpensive and can be used in all sorts of ways including being worn....as jewelry! The hardest thing is not to keep things like this for myself. None of these items and sets cost more than $3!


I use old books and encyclopedias for cards and collages. Sometimes it's hard to cut them up, but if they've been well read and loved, they are usually in pretty rough shape and they are ready to be reborn or "upcycled" into something new to treasure. I avoid Disney, Muppets or any such commercial images and stick to nostalgic ones.


One thing that will be collaged are vintage train cases. Why these went out of fashion I don't know- so much more glamorous yet sturdier than a dufflebag or backpack! Look for these on etsy soon.....


Old postcards are also great for collage or framing. Ones that have personal notes and stamps on them are even better! I also found an rusty owl trivet and a faux tortoiseshell tray. Again, will try hard and not keep but pass along upcycled....


Ah the days when restaurants, bars and hotels advertised with swizzle sticks and free matchbooks! They look beautiful in a frame, and were a steal. They are displayed in a silver footed bowl that was $2.


Some more maps, atlases and old Life magazines (too raggedy to archive) for collage or....?
And much more. It was truly a treasure hunt to remember.

A few tips for successful sale hunting:
  • Concentrate on estate and moving sales. Garage sales can be fruitful but will require way more work for many less treasures.
  • Hit sales in prosperous areas of town, areas where people moved in when they had young families and then grew older and never moved, or areas that are culturally rich with lots of creative people living in them. 
  • Bring cash.
  • Pay attention to the specific items that are listed in ads in the newspaper classifieds, Craig's List, or online. Phrases such as "collector" "artist" "crafter" "treasures" "vintage" or "antique" can be good, but sellers know this and may mislead you. Although "grandma's attic" "house full of stuff" or "gotta see to believe" might mean wonderful finds, they may mean hoarded junk too, so be careful.
  • To to find sales that are reasonably close to each other, but don't hesitate to drive to a barn sale or something else that lists fabulous things you love.  
  • Even if you don't find much, it can be fun to tour the homes and spend time with a friend who loves to treasure as much as you do.
  • If something seems too expensive, divide the price in half. Is it still too expensive? Forget it. Does it seem reasonable? Ask the people running the sale if things will be half price on Sunday, take a chance and go back then or make a bid. If you REALLY love it and don't want to lose it, pick it up and carry it around with you until you decide, then bite the bullet and buy it or the lost opportunity could haunt you. 
Happy hunting....and to see a fresh etsy shop called Mama Pacha that incorporates upcycled items including cassette cases and old books, go here: http://www.etsy.com/shop/MamaPacha?ref=seller_info


LinkWithin

Related Posts Plugin for WordPress, Blogger...